Block Printing in Discovery Art Lab

One of the first activities we tackled in Discovery Art Lab this semester was styrofoam block printing!  For materials, we're talking a list as simple as acrylic paint, some pencils, a bag of styrofoam plates, and the awesome imagination that kids are born with! I got the cheap plates from Target, and I have to say I think they're better for this project than they are for their intended use.  My husband stuck a piece of pizza on one, and it melted.
The plate, I mean.  Not the cheesy pizza.
But for creating one's own block print, they're perfect!
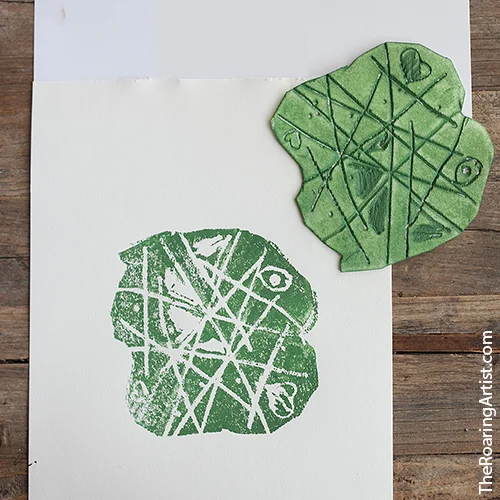
My example

My example

We started with a simple leaf that we all did together, so the kids could get a good grasp on the technique. 

TheRoaringArtist_DiscoveryArtLab_BlockPrinting_02.jpg
TheRoaringArtist_DiscoveryArtLab_BlockPrinting_03.jpg

The kids got the concept right away!

Then, after a quick discussion on positive and negative space, what level of intricacy works best on this sort of project (along with the acknowledgement that maybe my peacock was a bit much...), mirror images, and a little bit of color theory (I only stock white, black, red, blue, and yellow paints, so my kids get to do some color exploration every time they paint!),  I set them loose on their plates.

TheRoaringArtist_DiscoveryArtLab_BlockPrinting_04.jpg
TheRoaringArtist_DiscoveryArtLab_BlockPrinting_05.jpg

We even had a little sister drop by to get in on the printing! (She knew what she was doing, too!)

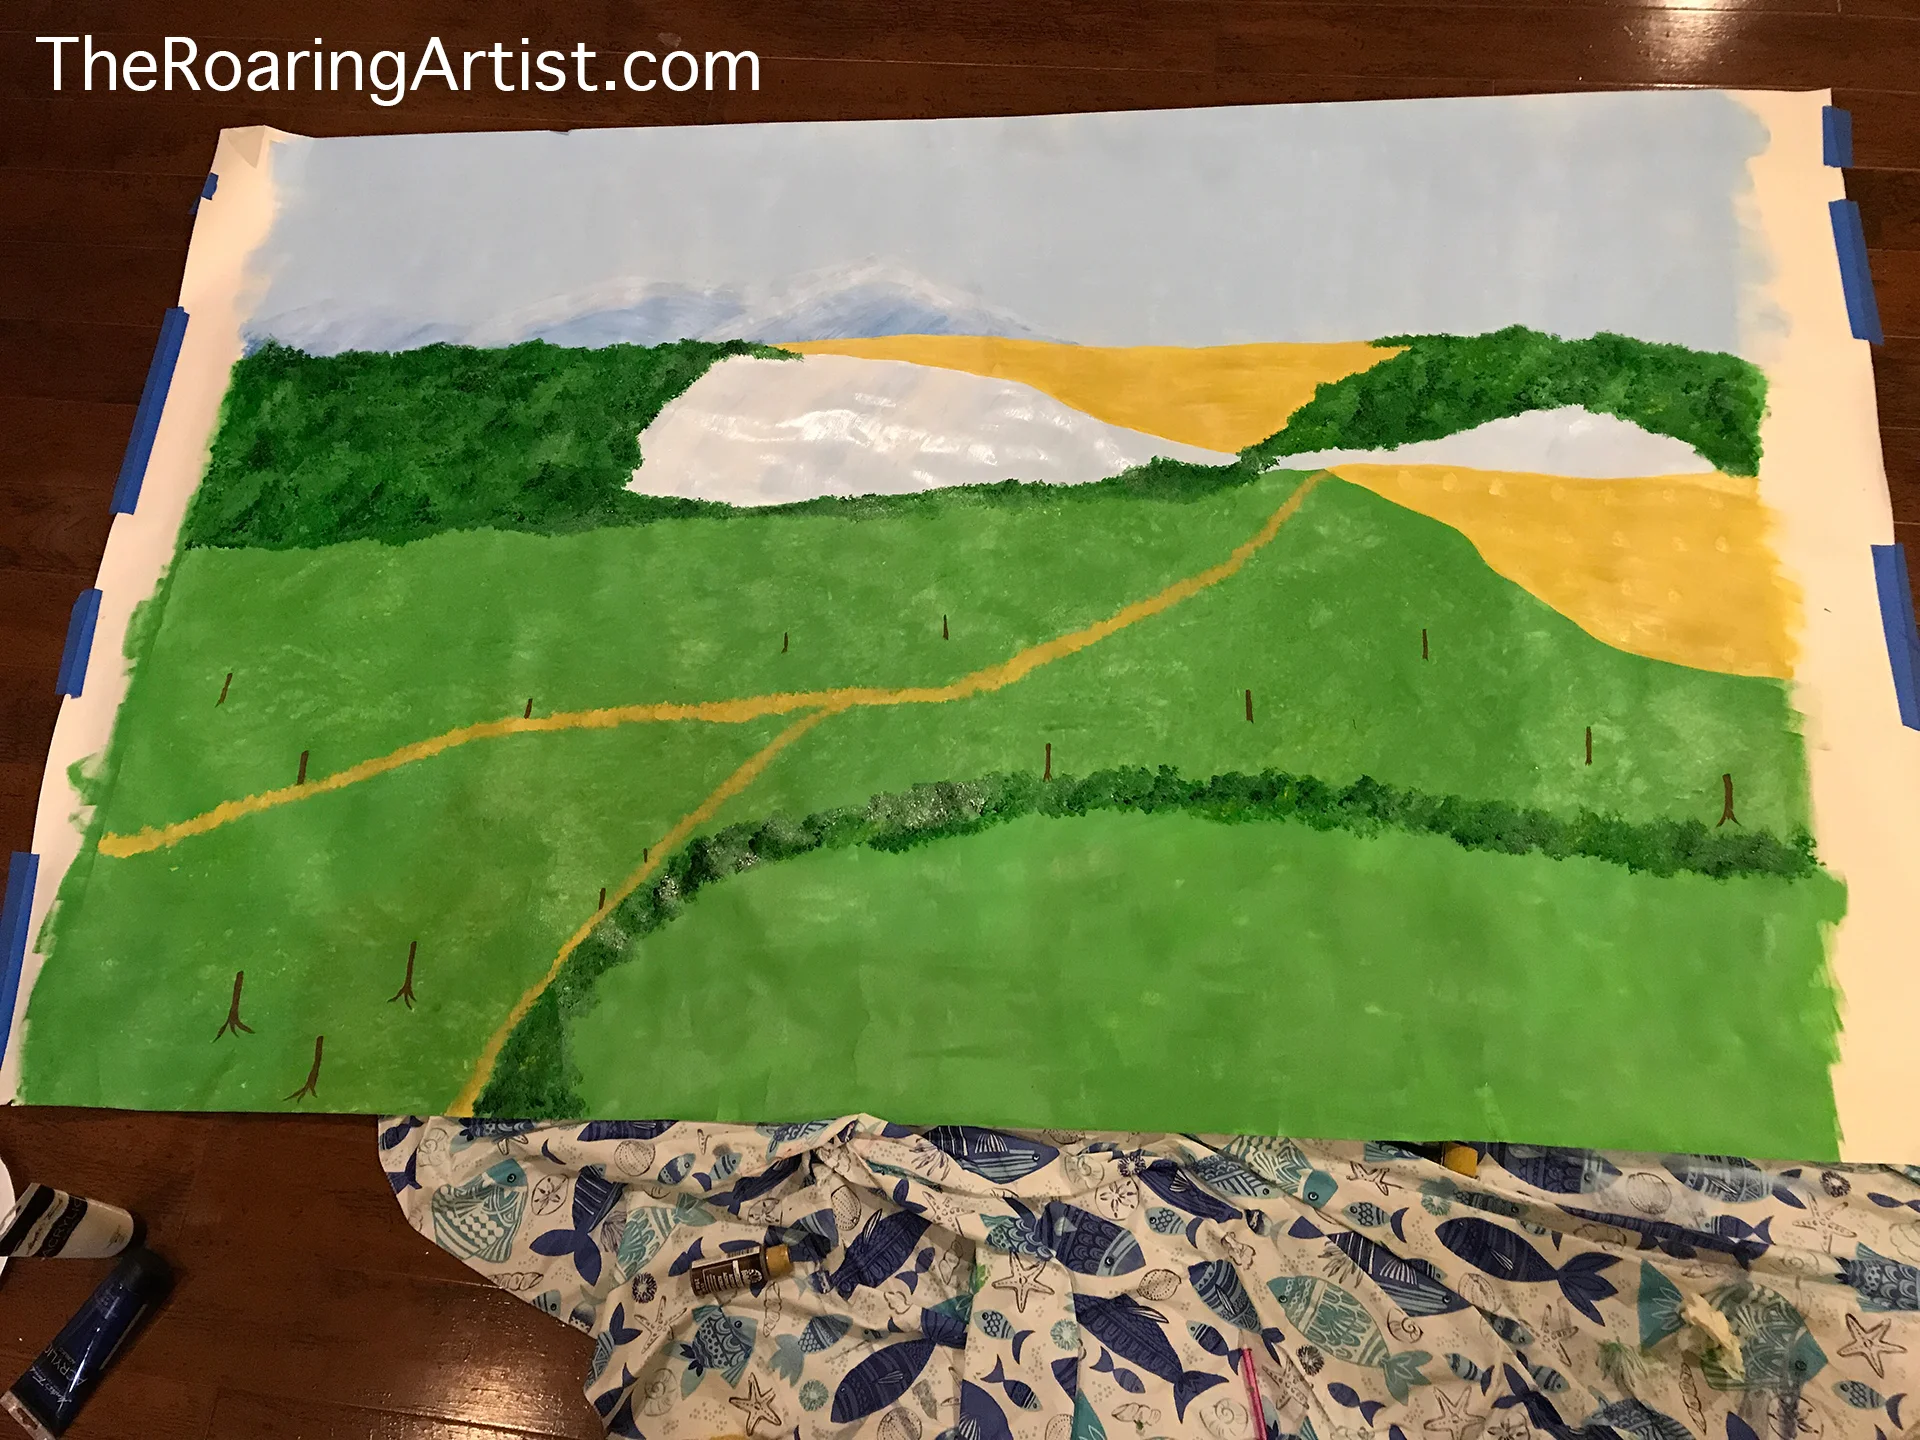
And the results?  Well, you can see that for yourself! Everything from Harry Potter's wand to dragons to whale tails to an awesome painted landscape- these kids are amazing!

Homeschool Co-op - Grandma Moses

Without a single doubt, one of my favorite things about being a homeschool mom is our co-op!  We're part of a local branch of a national co-op called Classical Conversations, and I'm sure it comes as no surprise that I chose a co-op that has a really great art component.  (Also there are things like this Forbes article does a better idea of explaining.. but you know, I REALLy like art!) For the first 6 weeks, we focus on an art concept- like "Abstract Art."  for the third 6 weeks, we focus on specific artists.  (In between is music, which I also enjoy!)

Since this cycle is the American history and geography cycle, it makes sense that we're also studying American artists.  And the first week was an absolutely fascinating artist- Grandma Moses! 

Quiet Village by Grandma Moses

Quiet Village by Grandma Moses

If you're not familiar with Grandma Moses, here's a brief bio. 
Although Grandma Moses is known for not really becoming a painter until she was nearly 80 and began to paint the idyllic scenes of her memories of growing up in pre-Industrial revolution New York, I would argue that's missing a lot about her personally.  She began painting as a child, using things like lemon and grape juice to make colors for her landscapes and continued an art habit all the way through her life!  But those lovely landscapes she painted late in life are what she's known for and what you'll see in museums and on the walls of upscale collectors. (Her most expensive painting went for 1.2 million in 2006!) Grandma Moses was 101 when she passed away, leaving us with these wonderful treasured memories!

Sugaring Off by Grandma Moses (sold for $1.2 Million in 2006)

Sugaring Off by Grandma Moses (sold for $1.2 Million in 2006)

Before we started this semester, the director and I got together to chat about how we wanted to introduce Grandma Moses to the kids in a really interesting way.  "What if we do a mural?" she mused.  "YES!" I said! 

I wanted the kids to be able to use acrylic paint for the quick-drying properties, so I needed a paper that was large enough for almost 40 kids, ages 4-11 to make a contribution, but heavy enough to support all that paint and glue.  You know what works great for that? Seamless backdrop paper.  It's also fairly cost efficient for the thickness and size.  You can find it here on Amazon, and you are welcome. ;) 
I chopped off a piece that was a little over 6 feet, taped it down to my living room floor, and started painting a backdrop!

Y'all, that was fun! Even when I sat smack down in the yellow paint!  Luckily, I was wearing my painting pants, and those are now just a little more decorated than before. Here it is when I finished it 

GrandmaMosesBackground_TheRoaringArtist.jpg

As an aside, if you ever do art with kids, you need to know about that fish drop cloth I stuck under there to paint the green without also painting my hardwood! At Walmart, you can find these inexpensive tablecloths that are vinyl (plastic of some sort?) with a flannel (cotton of some sort?) backing.  Those babies are amazing! Nothing gets through them, and they're also super soft on your surfaces! I have about 20, and I use them every single time I do art with kids!

Now back to our Grandma Moses mural! 

Our classes are split by age, and the kids range from 4-11.  There's a pretty wide range of capabilities there, but I wanted them all to have a significant contribution.  So what I did was paint in some tree trunks and leave an area specifically for the littlest ones to sponge in trees and bushes directly onto the mural.  They got to learn about paint mixing with the green, white, and yellows they used, and they also got to use a super fun tool with the sponges! 

My middle kids all made houses and barns.  Grandma Moses made some fairly busy scenes, so I figured ours would still be true to her work!  The oldest kids got a half paper to draw and paint their houses and barns, and the middle classes got a quarter paper.  This way, we were able to talk about perspective in addition to the lines, shapes, and colors that Grandma Moses used to create her simple buildings.  Having them work on a separate sheet of paper also made it a whole lot easier not to step on someone else's artwork or rip the paper as they crammed onto the mural!

Finally, the oldest class did our animals.  We limited them to only animals you might have seen in Grandma Moses' work, but we gave them free reign from there! 

After co-op, all the kids crowded around the mural with their dry and cut-out art pieces and placed them where they wanted to.  A couple other moms and I glued them all down with good 'ole Elmers, and we stood back to look at our finished mural. 

I can't really express it in words.  You'll just have to see it!

GrandmaMosesMural_TheRoaringArtist.jpg

The kids were SO proud of their work together, and my heart simply exploded!  It will be on display for the gallery show I get to put on every year for our end-of-year celebration, and I can't WAIT for everyone to see it again! 

I know kids love to be able to take home their work, but there's really something to be said for everyone coming together for a mural like this! I'll be doing it again in the future, for sure!  If you try it out, I would love to hear how it goes! Or leave me a comment with your best group project tips! 

Until next time!

Katie

Art Discovery Lab - Romero Britto Inspired Self Portraits

Today was supposed to be day one of my first Art Discovery Lab... and then we got Houston Snowmageddon #2!  So while everyone hunkers down and stays off the ice, I'm cheering myself up by re-living an AWESOME discovery lab I did a couple of weeks ago! 

RomeroBrittoSelfPortrait.jpg

If you think you're not familiar with Romero Britto's work, I bet you're wrong!  This Miami-based artist's bright, cheerful work can be seen around the world from galleries to giant public sculptures in places like Hyde Park to Build-A-Bear!  He even collaborated with Cirque du Soleil for 2007's Superbowl halftime show!

I love to introduce kids to great artists and then let them explore the style and make it their own!  And these kids sure did! We started with drawing our portraits in pencil and then went over our drawings with black marker.  Then we started filling in the spaces with fun, bright patterns- just like Romero Britto does!  I think they did an AMAZING job! 

RomeroBritto_010418_04.jpg
RomeroBritto_010418_02.jpg
RomeroBritto_010418.jpg

A couple of tips for guiding your own kids in creating a Britto-inspired self portrait:

- Create a quick head shape template.  This will help them get the head size and shape right, quickly and easily.  OR if they're feeling like an alien on the inside that day, they can use the head template for eyes instead. ;) 

- Help them draw in a super-light cross with their pencils first.  Tell them to tickle the paper with their pencils and not to press down at all, because this will be erased later!  This is useful for spacing when drawing the eyes, the nose, and the mouth.  You'll start with the eyes, using your fingers as spacers from the horizontal line, and you'll continue onward to the nose (the bottom will be in the middle of the vertical line), then the mouth. 

RomeroBritto_10.jpg
RomeroBritto_09.jpg

- From there, you can draw in the neck and shoulders (tell them to slant the shoulders line down instead of up, so it looks like they're shrugging... unless they want to be shrugging!), the hair, and all of the fun patterns that can fill each space!  

- We used oil pastels on paper for our project, but you could use colored pencils, crayons, or paint, just like Romero Britto, himself!

- To introduce Romero Britto, check out this Youtube video!  I think your kids will find it inspiring!  I know I did!

Let me know if you try it out! I would LOVE to see what your kids do!

Give a kid some art supplies and a little guidance, and she's going to create something amazing every time!

RomeroBritto_11.jpg

Hi! Welcome to The Roaring Artist

Hi! I'm Katie!

I'm a wife, homeschooling mom, art teacher, lover of fossils and antiques, and The Roaring Artist! I hope you'll stick around and get to know me! Everyone needs a crazy artist friend in her life, and I'll be yours... if you're nice! ;) 

I'm excited to have this blog on standby to share my art, my art classes, and maybe even a few of my own personal hijinks.  After all, life is art! 

But first, maybe I should tell you a little more about myself. 

I grew up in a tiny town in the Florida panhandle.  My family still lives in Florida, so I visit every chance I get! But since leaving that tiny, Southern town, I've left pieces of my heart in Saint Augustine, West Virginia, Philadelphia, and Denver.  Most recently, I have been writing my Houston chapter. 

I'm a classically trained artist. 
What does that mean?
Well, to me it means I lasted exactly one year in a great job in the financial industry before quitting to go to art school.  There I delved into the history and techniques I would need to be able to produce my own art work.  And produce my own artwork, I have!  I started in photography (a sensible place to dip your toe into artistic waters when your previous degree is in business), moved into digital art followed by mixed media jewelry and have landed smack in the column of 'many medium artist.'  You know what? I really like that!

Concurrent with our move to Houston, I began home schooling my daughter, and that's where my passion for art with kids has absolutely flourished!  It's so amazing introducing them to something or someone new and doing my best to contain my excitement, as I wait to see what wonderful things they'll find and do!  And so my most recent endeavor- an art class of my very own creation- has been born! I can't wait to see what happens next!

I hope you'll join me in my art, whether it's as a collector, a local mommy of a homeschooling student, or just someone who loves art as much as I do and wants to chat! I'm looking forward to meeting you!

KatieBradfordOsborne_BioPic.png